The habit of shaving has its roots in the distant past, so this process is well known to any man. True, at that time the “instrument of labor” had little in common with modern adaptations, but the essence of the procedure did not change. But even today, not everyone knows how to shave with a straight razor.
The most "capricious" razor
If there are practically no problems with modern tools, the use of a razor raises many questions and prejudices. She is by far the most demanding. At first, it should be used slowly and carefully so as not to damage the skin.
It is important not only to master how to shave with a straight razor, but also to know that it is imperative to take care of it and properly sharpen the blade. Then the procedure will bring only pleasure, since one pass shaves a fairly large amount of hair. This blade is especially popular among aesthetes and connoisseurs of the classics. Most often it is made of stainless and carbon steel, which is quite justified.
Dry shave
This type of removal of unwanted bristles means no need to moisturize the skin. You can shave with mechanical, electrical or electromechanical typewriters. The treated areas will not be very irritated, but the hairs will grow very quickly. The need to shave every day can be considered the main disadvantage of this method.
Wet shave
To figure out how to shave a straight razor, you need to understand that it is used for shaving with moisturizing the skin. This method is also suitable for using safe machines. This is a fast and reliable method that gives good results: the bristles grow much longer than after a dry shave. But you should know that irritation may appear, which even high-quality gels and balms do not always cope with. This is especially true of the winter period.
What do you need for a dangerous shave?
Recently, a dangerous shave is not as popular as before, but he still has dignity. The most important thing that is necessary for the procedure is a dangerous razor. On the market are models from different manufacturers, so the choice is quite large. To understand how to hold a dangerous razor, you need to know that it consists of a handle and a blade, which is made from steel of a special composition. The material has properties that help heal minor wounds and scratches.
An important accessory is a belt for editing. It can be suspended type or stretched on a special bar with a handle. Also useful abrasive paste and shaving brush. It is used to apply a cream that forms a thick foam.
Razor preparation
Before proceeding directly to the procedure, it is necessary to prepare a razor. Her need to "pull" on the belt. It should be done from yourself, controlling the constant angle of the blade. If you do not follow this rule, you can spoil the tool.
The foam is whipped with a brush and applied to the slightly moist skin. After shaving is complete, you need to attach a towel soaked in hot water to your face. Then you can apply a balm. Such measures will help avoid irritation and redness of the skin. If desired, you can carry on the face shaving gel.
Disadvantages of dangerous shaving
If you figure out how to shave a straight razor, then the disadvantages of this method can be minimized. But still they are: people who use such razors, note the high cost of the tool itself and the necessary accessories.
Great care is needed when handling the straight razor. One awkward movement is enough to damage the skin. During the whole procedure, the main principle should be followed - do not drive the machine horizontally.
For men who need a razor, reviews will help you choose the right model. People practicing this method of getting rid of unnecessary vegetation, argue that this procedure is a kind of ritual. Shaving brings undoubted pleasure, and the skin becomes soft and smooth.
Advantages of a straight razor
A machine of this type has several advantages, which are completely pointless to dispute.
- Long service life. If you know how to shave a straight razor, and handle it properly, edit it on your belt and not cut various materials, then it will last a very long time. Sharpening and cleaning of dark spots will allow the machine to pass on to the use of the next generation.
- Clean shave. Men who use a straight razor are sure that she shaves much cleaner than safe equipment. At first, it may seem difficult to use and inconvenient to use, but with experience it becomes clear that this is not at all the case.
- Saving. The advantages of a razor are that, although all the necessary accessories are not cheap, money is still being saved. This is because you do not need to buy a removable cassette. Paste must be purchased about once a year, and the belt can last for about thirty years, if you treat it carefully.

What you need to know?
If a man does not know how to use a straight razor and has no experience, he is usually very worried for the first time. Therefore, before the procedure you need to calm down, because it is extremely important to have a firm hand. To get used to the machine, you can twist it, try the sharpness of the blade, but do not start shaving.
The event will pass without complications and problems, if you remember three important rules:
- The razor should be well sharpened.
- The angle of inclination is 30 degrees.
- Face skin should be stretched.
If you do not comply with these points, it will be difficult to understand how to shave with a straight razor. If the blade is not sharp enough, then there will be cuts on the face even with the most careful and careful shaving. Observance of the angle of thirty degrees is also justified: thus, you can achieve maximum smoothness of the face and avoid irritation. Stretched skin is probably the most important thing. If wrinkles are formed, cuts are guaranteed.
How to shave?
You need to start with the preparation of the skin. To shave went smoothly, the face must be moistened and steamed. For these purposes, it is convenient to use a terry towel soaked in hot water. It is enough to attach it to the face for a couple of minutes.
Some men use soap for shaving, but it is better to buy a special foam. Start all the movements you need in the direction of growth of the bristles. To achieve smoothness, it is necessary to hold the blade several times in one area.
First of all, you should shave the right side of the face, pulling the skin with the fingers of your left hand. When excess vegetation is removed, you can move to the other side. In order not to miss the areas, the skin must be properly tightened.
To shave the lower part of the face, you need to tilt your head to the right or left, and then tilt back and walk the blade along the chin. All actions should be carried out carefully and slowly, so as not to be injured. Initially, the procedure will take a lot of time, but then it will go much faster.
Sometimes men doubt whether they need a straight razor. Reviews will help make the final decision. Experts claim that this method of removing bristle is worthy to master it. No wonder this procedure is called the "royal shave."

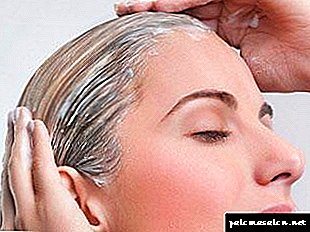
Head shave
Making the head smooth is easiest with two tools: a machine tool and a straight razor. You can not start the procedure without smearing the skin with gel, which forms a thick foam. It is more convenient to apply the product on the treated areas gradually, rather than simultaneously on the entire surface. But shaving the head with a straight razor on the back of your head can be difficult. To cope with this task will help the second mirror. Although many men agree that it is disorienting, therefore it is better to carry out all actions by touch.

After the head becomes smooth, you need to thoroughly wash off the residue and hair. Having felt the entire surface with your hands, you can determine where the bristles remained and repeat the procedure again. Shaving is necessary against hair growth.
High-quality shaving conditions - good sharpening
The basis of high-quality dangerous shaving - a sharp razor. It should be made of durable metal, not have bends and deformations. It is important to observe its maximum sharpness. If she is not sharpened too well, then it will be hard for the master to work with her. To obtain a quality result, it will have to be kept at a very sharp angle to the skin.
This leads to customer discomfort and irritation. Also increases the likelihood of scratches. Therefore, trust the professional to sharpen razors regularly. It not only sharpens it sharply and evenly, but also at the right angle.

Razor sharpness: you can change blades, but it’s better to sharpen
To understand whether your tool is well sharpened, whether it is not blunted in the process of work, you need to know a few rules.
- Visually the sharpness of the razor cannot be verified
- Popular test hair cutting. The razor is fixed on the table with the blade up. On top of it, perpendicular to the blade, hair falls smoothly and gently. If he only touched the blade, but split into two parts, then the grinding is done correctly,
- Experienced masters can test their sharpness with a finger, but this method is not recommended for beginners, since cuts can not be avoided.
To edit the razor on the belt with a special paste. At the same time it should be held at a certain angle to the belt. This is a rather complicated and specific process. But every master has to learn it, since editing a dangerous razor with a large flow of clients should be done quite often.
A bit of theory
Be prepared for the fact that the first time the result will be far from ideal, but over time, the hand will get used to perform movements perfectly true. Many quite rightly think - if the blade is so sharp, why risk it? After all, you can use the instruction - how to properly shave a man with a machine - it is less traumatic. The fact is that the razor removes the smallest hairs on the face, the skin is clean and smooth.
Professional Tips:
- never use a blade razor when you are in a bad mood, tired or upset about something, its use requires maximum concentration and absolute calm,
- for the first time, do not try to shave your face completely, start with flat areas - cheeks,
- the process is complicated, so it will take weeks or even months to master the skill
- In addition to theoretical information, be sure to check out the video - how to shave with a straight razor - a good example is always more effective, it will help to catch minor details.
And as the last recommendation of the video from the most famous manufacturers of blade razors - Mr. Boker and his son.
It is important! The use of a dangerous razor, in addition to perfectly even and smooth skin, can bring great moral satisfaction. The main thing is to have patience and methodically hone skills, movements and skills.
How to hold a tool
Keep the straight razor correctly using two methods. Sometimes they emit more, but the rest are just a type or derivative of the main ones.
- The main method. Hold the tool in the right cyst (or left for left-handers). Blade facing down, handle - up. The thumb rests on the lower part of the razor, to the left of the cutting edge, closer to the heel. The little finger lies on the untidy edge, at the end of the razor, behind the junction with the case. The rest of the fingers are on the not edged edge,
- The second method. Take the tool in the leading hand. The blade is turned up, the handle is down. The little finger under the tail, for the fastening screw to the case. The thumb is on the inside of the not-edged edge with notches, all other fingers are on the outside.
The second method is considered more convenient. But each master must choose it individually.

Personal care products for a dangerous shave

- Straight razor. Do not buy a razor Chinese brands, because their edge is uneven, the wrong geometry. Such equipment is simply not suitable for shaving, it is impossible to sharpen the Chinese blade.
- Strap for straightening the blade. Most often used manual (suspension) stretch, but will fit other types of belts. When choosing a model, pay attention to the presence of the fabric side.
- The following tools for the care of a beard auxiliary, but very useful:
- special soap or foam for a straight razor,
- shaving brush
- cups for the preparation of foam.
A few words about choosing a razor

If you want to buy a truly high-quality blade razor, choose the following brands - Dovo, Thiers-Issard, and Böker. If your budget is limited, you can buy a Giesen & Forsthoff brand GoldDollar. Their quality is somewhat inferior to the quality of famous brands, but in general, you can shave. Remember that new razors need to be sharpened.

It is important! Vintage razors are in no way inferior to new, expensive models, and in some matters even surpass them. Look for such a rarity on a special site - the club of dangerous razors. Most razors have already passed the test of time and, of course, high quality. If you are a beginner, do not buy an old blade blade on eBay - it is impossible to assess the quality from the photos on the website.
How to edit a razor
Blade razor is equivalent to a weapon, and how any weapon must be followed and looked after. Care is to polish the blade on the belt, which must be made of genuine leather.

Grinding is performed according to the following scheme:
- turn the belt inside
- stretch slightly
- The blade should be directed strictly to the person, and the back part is slightly raised above the belt.
The procedure is carried out regularly, but you can not grind the blade immediately after shaving - microdamages remain on the surface, which can cause chipping.
Strap leather
To properly shave a straight razor you need to know how to properly tension the skin. It is necessary to tighten it every time the tool moves in the direction opposite to the blade movement. Position your finger for 1.5 - 2 cm from the cutting edge and move by pressing on the skin. Use the index finger of an unknowing hand (i.e. not the one with the razor).

Basic principles of perfect shaving
- The main secret is in the sharp blade.
The better the sharpened blade, the easier it is to follow the shaving technique, respectively, the result will be better. A poorly sharpened blade will cause irritation to the skin.
- How to hold a razor.
There are three ways to hold the blade.

- The little finger on the notch, the thumb at the bottom of the neck and rests on the heel, the other fingers on the earl.
- The little finger on the notch of the tail, the thumb on the earl, the other fingers from the outside. This method is in many respects similar to the first. The difference lies in the direction of the blade - it is directed upwards.
- The blade is directed upwards, the middle and index fingers are located on the inner side of the earl, the ring finger holds the tail, the thumb is the pick in the part of the junction with the blade. Make sure the handle is snug to the wrist.
It is important! Regardless of which method is chosen, the hair should be removed without effort, it is impossible to press on the blade.
- How to properly tighten the skin.
The basic rule - skin tension in the opposite direction of the razor. The scheme of action is as follows:
- skin with one finger, it is most convenient to use the index or middle,
- finger located a few centimeters from the blade,
- skin needs to be tightened before each movement of the razor.
It is important! Pay special attention to areas where the natural tension of the skin is minimal. First of all, it concerns the cheeks - if you do not stretch the skin enough, you can be injured.
- The angle and direction of the blade.
The tool should always move the toe (head) forward, the angle of inclination is not less than 30 degrees, but not more than 40 degrees.
Movement should be easy, relaxed. Only the brush should move - rhythmically and often. If you shave the whole hand, the hair will not be cut off, but pulled out, and this is painful and irritating.
Tool angle: even if you have Solingen, the rules are the same for everyone.
The tool moves the head forward, with short movements, strictly on a stretched area of skin. So that the skin is smooth and the quality of work is high - keep the razor at an angle to the skin surface 30 - 40 degrees. If the angle is even sharper, so much the better. The movements are smooth and frequent.
Such shaving will take place with maximum comfort for the client and convenience for the master. This reduces the likelihood of scratches and injuries.

How to shave with a straight razor - video lessons and practical recommendations
It is necessary to prepare the face for the procedure - take a hot shower or twice for 5 minutes apply a steamed towel to the face.
After that, you should soak a shaving brush in the hottest water possible. Then you need to squeeze out excess water and beat the foam in a container where the brush is soaked (pour out water) or directly on the face. Before applying the foam face should be wet.
The foam is applied to the parts of the face where the hair grows, it should be thick and dense. Use a hot towel to remove the extra stump - this will cleanse the skin of sebum. Reapply the foam with short strokes and leave for 5-10 minutes. If during this time the soap dries, the foam is applied again. The foam layer should be maximized - this protects the skin from the sharp blade.
It is important! The three most traumatic sites are Adam, ears, lips.
Now you can proceed directly to shaving. Movement is performed from the temple. If you are using the blade for the first time, just lay it flat on your face and then lift the blade at an angle of at least 30 degrees and no more than 40 degrees.
A quality procedure involves several steps:
- hair growth
- against hair growth.
Before the second stage, the face is washed and re-washed. Now we will consider each stage in more detail.
Hair treatment on the right side of the face

Movements start from the temporal line, dropping to the cheek. Razor need to keep the first way. First, remove a little foam at the temple line - it is necessary to exactly expose the blade. The skin is slightly stretched and hair is cut off with a slight movement. In this way, a few centimeters are processed down, then you should move to the jaw. To do this, in the middle of the cheek blade slightly rotated in the direction of the lobes.
It is important! In the corner of the jaw the hairs tend to grow chaotically, it is important to move in the direction of growth.
With special attention should be treated area near the ear. To do this, slightly ear ear from the blade and then cut off hairs.
Then the blade should be taken in the third way, set in the middle of the cheek, the edge should be located below the cheekbone. In this position, process the cheek in the direction of the lips.
After that, the blade moves to the hairs that grow under the lower lip.
Tip! Use a tongue to form a small bulge, so working with a blade is much easier. Throughout the process it is important to use the muscles of the face - it protects against injury.
Cutting the hairs on the chin, you need to monitor the position of the razor, since it is here that cuts often occur. From the chin to the mouth, the hairs are cut off with a blade in position 2 or 3. The main task is to stop the blade in time so as not to damage the lower lip.
Mustache modeling is a complex process. Given that the hair here grows from top to bottom, the blade should move as well. The blade should be kept in position 1. Movement should be short and clear. The side of the whiskers is shaved in the direction from right to left, using only the blade head. The hairs are cut to the middle, moving lower, you can cut your lip.
Razor hold the first way and handle the area from the chin to the center of the jaw. The skin should be stretched in two directions - one finger on the chin, the second - on the jaw, and the blade - between them. The tool works quickly, easily, without pressure.
The last stage - shaving the neck. To avoid cuts in the Adam's apple, the skin in this part of the neck is pulled aside and after that the hairs are cut off. The blade is held in position 2.
Treatment of the left side of the face for hair growth

Razor taken in the first position, while the blade head should not overlap the view. Movement begins again from the temple line. The blade is lowered a few centimeters, you need to make sure that the cut to the right and left is at the same level. Landmark - conditional eye line. The razor moves down in the direction of the cheek.
After that, the blade moves from the center of the cheek to the chin. Razor set on a conditional line from the eyes to the lobe. In the course of processing the area of the sub-bushes and the lower part of the whiskers on the left. To facilitate the cutting of the whiskers, it is enough to raise the tip of the nose. The blade is held in a mode of 1.
The next stage is cutting off the remaining part of the hair in the mustache area - small movements from left to right. The hairs should be cut sideways in the direction of their growth. Blade in position 2.
The blade is set near the lobe and moving in the direction of the chin. The skin should be pulled diagonally - up to the ear.
As for the area above the upper lip, it can be cleared by treating the right side of the face. If there are minor hairs, they are removed at this stage. Blade taken in 2 or 3 way.
After that, the hairs are cut off from the neck - the blade is held from the chin to the Adam's apple. Directly Adam Shaving impossible. It is necessary to delay a little skin and only after that to process the area.
Then go to the rest of the neck - the blade in position 1, it is set below the jaw and a slight movement is carried out until the end of hair growth.
It is important! In the lower part of the neck, hair often grows from bottom to top. To shave them off, the blade is taken in the second way and performs a bottom-up motion.
Treatment of the right side of the face against hair growth

A repeat step is needed to remove the remaining hairs and bring the shaving process to perfection. Before that, you need to apply foam, if the bristles are soft, just wash with warm water.
Cut off the hairs from the neckline, the blade moves in the direction of the temples. The right side of the face is processed with a razor in position 3. The skin is tensioned in the opposite direction of the blade.
First of all, the right side of the neck is processed below the ear, the blade is gently moving towards the cheek. If the face is thin, it is safest to change the direction of the razor near the ear - behind the lower jaw.
After processing the cheek, the blade moves to the temple, then again from cheek to chin, at the same time the hairs in the lower right part of the whiskers are cut off and near the right corner of the mouth.
At the last stage, hairs are removed on the neck. The blade continues to move from bottom to top, in the direction from the Adam's apple to the chin.
Treatment of the left side of the face against hair growth

The left side of the face is washed or just washed away. When processing the left side, the blade must be kept in the second way.
The sequence of actions is much the same as shaving the right side. The razor moves from the neck up, near the lobe the blade gently bypasses the lobe and moves to the temple.
After that, from the center of the cheek, the blade is directed to the chin, then the left side of the whiskers and the left corner of the mouth are processed. At the final stage, the hairs in the lower part of the neck are shaved to the jaw. Now the last detail remains - to treat the area around the mouth. Along the line of growth of the whiskers, the blade moves along the growth - from above - down. Under the lower lip - the direction changes - from below - up. Razor need to keep the second way.
At first, it is quite likely that even after repeated processing it is ideal to cut off all the hairs, it will not work, in this case it is necessary to lather the face again and cut off the remaining hairs against growth.
In the end, be sure to watch the video - how to shave with a straight razor. The master will tell you how to choose the right tools, prepare the foam and shave your hair as safely as possible.
Warnings
- If you had to shave for the third time, go around the area above the upper lip.
- Never treat mustache movements from bottom to top, you can injure the nose.
- Never catch a razor during a fall.
- Do not go with an open razor.
- Movement should not be incising, only smooth and clear.
- Before you begin to shave, calm down and focus.
So, now you know how to properly shave a straight razor, photos and videos will help to more clearly explore the technology, the sequence of actions.

If you are not ready to master the features of the technology yet, familiarize yourself with the material - how to shave an electric razor.
For those who prefer perfectly smooth skin, we once again recall the basic principles of using a safety razor:
- carefully study all three ways to hold the blade,
- cut the hairs only at a certain angle - from 30 to 40 degrees,
- take care of the blade, it should be perfectly sharp,
- in the first stage, cut the hairs in the direction of their growth, and then - against the growth.
Be sure to share material on social networks, because working with a blade razor requires caution. Perhaps our material will save from injury.
The sharper the razor, the smaller the bristles
The sharpness of the blade is a fundamental condition for a proper shaving technique with a straight razor. A poorly sharpened blade cuts off bristle poorly. They have to work with more effort or at a more acute angle. All this leads only to irritation on the skin, the risk of injury and discomfort. But does not guarantee the purity of shaving.
You need to shave so that the blade slides over your face. “Hazard” should be at a strictly defined angle and must be moved in the right direction.
Basic methods of holding a razor
For those who want to understand how to shave with a straight razor, first learn how to hold it. There are three basic ways to hold a tool in your hand:
Method one. The little finger is at the notch of the shank, the thumb is at the bottom of the neck and rests against the heel. The remaining fingers are on the earl of the tool above.
The second way. The little finger is on the tail notch, the thumb is on the flat part of the earl from the inside, the other fingers are vice versa from the outside. This technique is almost identical to the first, the differences in the direction of "fear." In this way the sting looks up.
The third way. The sting of a razor looks up. The middle and index fingers - on the inside of the earl, the ring finger holds the inside of the shank, the little finger - on the tail notch. Large holds the edge where the shank connects to the blade. Handle "fears" should fit snugly to the wrist.

The last, third, reception, how to shave a straight razor, is considered non-standard, it is not found in specialized literature for hairdressers and is invented by experience. But it is used. It is useful in those cases where the first two methods cannot be applied (for example, when the hands close the view), while the “danger” should move “through the hair”. For those who plan to shave on their own, this technique must be studied.
When working with any of the methods of shaving, you should remember the general rule: “it is necessary” to remove hair easily, it does not need to press hard.
How to stretch the skin
The technique of shaving with a straight razor provides for the mandatory stretching of the skin of the face. Her pull in the other direction from the direction of the razor. Remember to tighten the skin near the blade before any new tool movement. The skin is stretched with one finger. It should lie within 2–3 centimeters from the instrument. It is most convenient to use the index finger or the middle finger of the left hand, if the shaving right-handed, or the right hand - if the left-handed.
It is clear that to work with "caution" you need to use both hands: one - holds the tool, and the other is involved in stretching the skin. Without this, a smooth shave will not work. How to stretch and how to shave a straight razor can be viewed on our video.
Procedure: stretched area of the skin, put the blade, cut off the vegetation, the tool is taken away from the face. Next, a new section is stretched, “danger” is put in and the hair is cut off again.
Particular attention should be paid to those areas that do not have natural tension. For example - cheeks. There should be especially good stretch, otherwise there is a risk of injury.
The slope and direction of "fears"
The tool always moves the head forward. You should make sure that he cut the hair at an angle. It provides an effective and painless shave. The inclination of the blade to the surface of the face should be from 30 to 40 ° and not less.
It is easy to understand how to shave a straight razor correctly: you need to work with an instrument often and easily, without pressure, a brush participates in the movement, rhythmic and light manipulations. This is the key to a smooth and clean shave. It is impossible to put pressure on the "watchfulness" or "include" the whole hand in the work. This will only lead to the pulling out of the vegetation and, as a result, to irritation and pain.
Preparatory stage
First, the ford is washed with a shaving brush, then the shaving process begins. To better understand how to shave with a straight razor, you can watch the video on this page.
Begin to shave from the temple. For beginners, it is difficult to immediately place the razor at the correct angle, so first it is better to lay the blade flat and then slightly raise the back of the “danger” by 30–40 °. Next, you should move the tool in the direction of shaving. This is done easily, without pressure on the skin. If the blade is sharp, it will cut the hair without any problems.
Usually shave in two sets. First, they pass by the blade in the direction of hair growth (by growth), and then vice versa (against growth). In the first case, it is possible to get rid of the bulk of the vegetation, but tiny tips of the hair remain on the skin. To get rid of them are a razor a second time. Before that, the face is again soaked or moistened with warm water. After repeated shaving the skin becomes ideally smooth.
How to shave the right side of the face in height

Shaving with a straight razor, as shown in the video, starts from the temple line, then the blade goes down to the cheek (fig. 2, I-1). The tool is held in the first way. Before starting it is worth a little to remove the foam from the temple (to put the blade exactly along its edging). In the temple area, skin tightening and hair cutting are performed simultaneously. Light manipulations hands make their first couple of centimeters down. Next, "fear" is moving to the lower jaw. Hair cutting must necessarily be accompanied by tightening of the skin. The finger should be 1-2 centimeters from the "fear".
In the middle of the cheek, the blade slightly turns to the side of the lobe, and the “danger” moves to the jaw (Fig. 2, I-2). It happens that in the corner of the jaw the hairs grow in different directions, in this case it is necessary to place the blade so that it shaves in height.
Having reached the bend of the jaw, the instrument is turned and continue to move down to the neck. In this place it is worth especially carefully cutting the vegetation near the ear. Often there is a bulge or small folds of skin that are easy enough to hit with a blade and cut. How to shave with a straight razor to avoid injury? With your thumb, you move your ear a little to the side; if there are no folds, then when working near your ear you still need to close it a little with your hand.
Next, take the tool in the third way.“Hazard” is placed in the middle of the cheek, so that the end of the cheekbone lies below the cheekbone. So shave, heading for lips. At the same time passing along the maxillary bulge and capturing a small part of the face in the area of the whiskers (Fig. 2, III-3). Approaching the corner of the mouth, the sock of the “fear” should be lowered a little lower, so that in the end it coincides with the line of the mouth. Next, the blade passes in the area of the so-called shrouds (hair that grows at the lower lip). They are not always able to shave from the first time, as they are in a small cavity. In this case, a simple trick will help: you need to raise this place a little with your tongue. There is a bulge that will be easily shaved off. How to do it while shaving with a straight razor is shown in the video. In the process you always need to help yourself with the muscles of the face and tongue. This greatly facilitates shaving and saves from injury.
The third way is to cut the vegetation to the center of the chin, until the tip of the "dangers" and the nose are in one line (it is better to take the razor a little further than this line). At this area of the face should be especially careful: the chin is difficult to shave, so you need to properly keep the "fear".
Then the instrument is taken using method No. 2 or No. 3 and the hair is cut from the chin to the lip (Fig. 2, II – III – 4). Here it is necessary to be extremely careful and stop the "fear" in time. Otherwise, the blade will hit the lower lip, which has a small protrusion. On the face there are several areas prone to injury: Adam, ear and lips. In these places you should shave with special attention.
The next step is shaving a mustache. This is a difficult area: here the hair grows from top to bottom and according to the rules of shaving the blade should fall from the nose to the upper lip. But it is difficult to do, because the skin area is too small. And still there is a high probability to touch the lip and leave a cut. How to shave a straight razor in this case? Very simple. A person who shaves himself can help himself a little with his facial muscles and make the skin, where necessary, a little wider and smoother. Or tighten your hand over the tip of the nose, in which case the skin will also stretch and become even.
In the area of the mustache "fear" is kept the first way. Hair is cut off by light and short manipulations of the instrument (Fig. 2, I – 5).
The side part of the whiskers is shaved from right to left (Fig. 2, III – 6). Only the razor sock is involved in the work. The tool is held in the third way. Blade lead to the middle of the mustache, if you shave higher, you can hurt the upper lip.
Then the vegetation is cut from the chin to the middle of the jaw (Fig. 2, I – 7). "Hazard" is kept in the first way. Here, the skin stretches a little differently than usual: this time the skin is stretched in two directions. This is easy to do with two fingers. One is on the chin, and the second is on the jaw, "fear" is between them. It should be borne in mind that in this case the skin becomes less elastic, which means that the risk of injury will increase. Therefore, at this stage you need to work with the tool easily, without an onslaught and to observe the angle of trimming the hair. Passing this area, you should remove the hair slightly lower than the jaw bone.
The final step in shaving this part of the face is the neck (Fig. 2, I – 8: 10). Here it is worth paying special attention to the skin in the area of the Adam's apple, where cuts often occur. To avoid them, use the following trick: the skin from the Adam's apple is pulled slightly to one side and already there is shaving. The tool is held in the second way.
Shaving "on the hair", you should monitor the quality of work. The face should be clean, without the "bushes" of hair and un-shaved areas.
How to shave the left side of the face in height

The tool is taken in the first way. Sock "fear" is set so that the hands do not interfere with the review. Shaving with a straight razor (this can be seen in the video) starts from the temple (Fig. 3, I – 1). First, shave 20–30 mm from the border line. It is important that the cut lines on both sides are at the same level. For this, it is convenient to navigate along the conventional line of the eye. The blade should lie on the temple approximately parallel to this guide. From the temple "fear" falls down to the cheek.
Then you should shave from the middle of the cheek down to the chin (Fig. 3, II – 2). "Worry" set slightly below the cheekbone so that the cutting edge creates a conditional line from eye to earlobe. Along the razor’s path, the hair is shaved in the area of the bushes and the lower part of the left mustache. “Worry” should be kept in the second way. If the blade cannot cover the entire soaped surface at once, then after the first pass with a razor, repeat the procedure, capturing the soaped areas.
During this stage of shaving, half of the whiskers are shaved. But sometimes this is not enough, and you need to help yourself by raising the tip of the nose and removing vegetation (Fig. 3, I – 3). In this case, the first method of holding the razor is used.
Based on the correct technique of shaving with a straight razor, in the next stage, the remaining hair in the area of the mustache is reached. This is done from left to right with small razor advances. The vegetation is cut sideways in the direction of its growth. “Hazard” is held in the second way (Fig. 3, II – 4).
Then the blade is placed near the lobe and the vegetation is removed to the chin (Fig. 3, II – 5). The skin is stretched diagonally - upwards and towards the ear. If the face is thin, then shaving below the jaw, the skin is pulled only up.
If for the first approach it is impossible to remove the hair across the entire width of the section, then the procedure should be repeated once more, but already go through the places where the soap "islands" remained.
Working with the right side of the face, it is possible to almost completely shave the area from the top of the chin to the lip. But if there are still hairs there, then now is the time to remove them. “Worry” is taken using method No. 2 or No. 3 and vegetation is removed (Fig. 3, II – III – 6).
Next, you should go to shave your neck. First, they pass by the blade from the chin to the Adam's apple, bypassing it on the left side. It is impossible to shave the Adam's apple himself, as mentioned above, it threatens with cuts. Need to pull the skin to the side and only then remove the hair. Then the rest of the neck is shaved. In one approach, a narrow strip of vegetation should be shaved (Fig. 3, I – 8: 10), the razor should be placed in the lower part of the jaw and carried on until the end of the hairline. "Hazard" is kept in the first way.
Sometimes the hair at the very bottom of the neck grows in the opposite direction - from the bottom up. How to shave with a straight razor here: you need to change the direction of the tool, while at the same time you need to take it with the second method.
How to shave the right side of the face against growth

Re-shaving is needed to shave off the remnants of hair that remained after the first stage of the procedure. And also to make the skin perfectly smooth and clean-shaven.
Before shaving again, it is necessary to lather the face again. For people whose bristles are not too hard, you can simply moisten your face with warm water. But such a procedure must be done necessarily.
When shaving razor, as follows from the video, "fear" moves against the growth of vegetation. Bristle removal starts from the neck and ends near the temples. Work on the right side of the face is done only in a third way. During shaving off the bristles, the skin also stretches in the direction opposite to the razor.
So, you must first go through the razor right side of the neck (the one below the ear) from below - up, then you need to smoothly go to the cheek. For people with a thin face, the best place to go will be a place near the ear, around the corner of the lower jaw. Those who have a full face, you can go anywhere.
Having finished work on a cheek, the razor rises to a temple. Then again from the cheek "fear" moves to the chin. At the same time, the bristles of the lower part of the right mustache and in the area of the corner of the mouth are removed.
In conclusion, the procedure should shave the bristles on the neck. As at the very beginning, the tool should move upwards, from the tub to the very chin.
How to shave the left side of the face against growth

This part of the face is also rewashed or moistened with warm water. The left side shaves only in the second way.
The sequence of passing the "caution" is similar to shaving the right side. First, from the neck, the blade is led upwards, around the angle of the jaw, around the lobe, and sent to the temple. Further from the middle of the cheek are a razor to the chin. Then the left mustache is shaved off, vegetation around the corner of the mouth and the top of the chin. In conclusion, the razor passes the neck from the bottom up, up to the jawbone.
If the two parts of the face are shaved, the final touch remains - re-removing the hair above and below the lips. In the area of the whiskers, “fear” moves “along the hair,” that is, from the top down. Under the lip - shave bottom - up. During the procedure, the razor is held in the second way.
If after re-shaving there are still "islands" of hair, then they are washed again and cut off against the growth of hair.
From the article outlined above, it became clear how to shave with a straight razor. To do this correctly, to get a smooth, clean-shaven skin and not be injured, you should remember the basic rules:
- learn the basic ways to hold a tool in your hand,
- remove hair only at a certain angle
- the blade should always be as sharp as possible
- First, go through the tool in the direction of hair growth, and then in the opposite direction.
The correct technique of shaving straight razor: instructions for men
Use a straight razor is necessary for specific instructions. The face is processed in several stages, following which is mandatory. This will allow you to get the best result in conjunction with the speed of work and comfort for the client.
The instrument must be sterilized after use on the previous client and placed in a separate box. Before you apply it again, it must be treated with an antiseptic. Some masters reuse antiseptic and in the process.

Beard or stubble soaping brush. The master pours a glass of warm or hot water and prevents the razor from going there for a few seconds (the working surface of the instrument). This is done so that it is heated and the manipulations do not cause unpleasant sensations, goosebumps or a desire to flinch at the client. All this hinders the process.
In order for the instrument to acquire a comfortable temperature, a few seconds are enough.

Right side shave
Learning to shave with a straight razor suggests that it always begins on the right side of the face of the client. Some masters start from the left, as it is more convenient for them.
- The first movement is directed down from the temple, parallel to the cheekbone,
- The second movement - the angle of the lower jaw,
- The third is above the second, from the center of the cheek down towards the chin,
- Fourth - from the chin up to the lip,
- Fifth - three movements in the mustache zone above the upper lip,
- The sixth is on the side of the lip, starts a little to the right of the corner of the lips, moves to the fifth movement zone,
- Seventh - from the chin to the corner of the lower jaw along the edge of the face,
- Eighth, ninth and tenth - three movements from the neck from top to bottom.
During the whole process, the skin of the face should be stretched.

Shave the left side
The straight razor shaving technique suggests a different way of working with the left side of the face. This is due to the fact that most of the masters own hands strongly cover the review.
- The first movement from the temple down, as well as on the right,
- The second movement - on the cheek - is similar to the third on the right,
- The third - three short movements above the upper lip,
- Fourth - from the place to the right of the corner of the lips to the mustache zone and from the same place down to the chin,
- Fifth - a series of movements along the line of the lower jaw, from its angle to the chin,
- Sixth - Chin to lip, bottom up,
- Seventh, eighth, ninth, tenth - a series of movements from the chin and jaw line down to the neck.
No matter how badly you manage to sharpen a dangerous razor, after such a shave, hair growth will still leave bristles. To eliminate them, re-shave against growth.

Second phase
Starts on the right. The first movement is on the neck, closer to the ear, from the bottom up. The second is the angle of the lower jaw to the temple. The third is from the jaw up. Fourth - from the jaw to the ear. Fifth - from the jaw to the chin. Further, the chin and the zone to the side of it are shaved, in the direction of the mustache growth line. After that, re-shave the area under the lower lip and neck, moving upwards, that is, against hair growth.
From the left you start also from the neck. Then three movements from the bottom up shave your cheek. The fifth movement starts from the corner of the lips down the chin, the sixth - from the same zone up to the nose. Then the area under the lower lip and neck is shaved.
After the procedure
Wipe foam from skin with a towel. Now wash with cool water. When the skin is prone to irritation, use a warm compress with a damp towel for a few minutes.
 Shaving caution is a whole range of activities, be prepared for them.
Now apply any after shave care that is suitable for your skin type.
What is a razor
A dangerous, or bladed, razor is a tool with an open blade. Shaving with a straight razor, often caused cuts, as this is a procedure that requires a cold head and a firm hand.
There are different bladed razor models. They are heavy, from a single piece of metal, and lightened - empty and half empty. A simple razor consists of a handle and a working part. The latter, in turn, has a head, a back with a double base, a blade, an eral (tail) and a heel.

The blade of a razor can be round, rectangular, semi-circular, oblique, "French" or serrated. The rectangular head is the most common, because its sharp corners allow you to shave off hair in the most inaccessible places, but at the same time it is the most dangerous type of device. Sharpening a razor requires time and skill.
The distance between the back and the tip is measured in eighths of an inch. Narrow razors with a 4/8 blade are used to correct beard and shave in hard-to-reach places. The most popular size is 5/8, but there are also lovers of wide 7/8 or 8/8 inches.
Another important characteristic of the bladed razor is blade geometry. It may be wedge-shaped, biconcave, or mixed.
The blade can be made of steel of different types:
- Damascus - the most durable, reliable and expensive. It is almost a perpetual tool, but it’s difficult to grind.
- Carbon. The blade of this material can be sharpened to a scalpel. At the same time, carbon steel is quickly corrosive.
- Stainless. Sharpening these blades is not easy, but they are not afraid of corrosion and last long enough.
The handle is made of wood, bone, horn, steel and plastic. There are expensive antique models with a handle made of ivory.

Benefits
The main advantages of the shaver are:
- Does not irritate sensitive skin. Some cosmetologists claim that shaving in this way is the safest and even beneficial to the skin. This is due to the techniques of cutting hair.
- Provides cleaner shaving. A well-sharpened tool in skillful hands cuts off hair more carefully than its safe counterparts.
- Blade can be sharpened by yourself.
- Multifunctional.
- Savings due to durability.
disadvantages
The main disadvantage of the razor is its name. An unprotected blade in inexperienced hands can cause severe cuts, and a bad edge can cause skin irritation and poor-quality shaving. The razor does not forgive fussiness, haste and carelessness.

Another drawback is the difficulty of acquiring a good tool and its high cost. At the same time, a quality razor will last for many years.
Preparation for the procedure and what you need
Professional barber before the start of shaving put on a hot towel wet face. This is done to make the skin and hair softer. The towel is kept on the face for about 4 minutes. To soften the bristles use special conditioners and oils that need to be washed off before applying shaving cream.
At home, before handling, you need to wash in warm water and soap. The hotter the water, the better.
Shaving need capacity for foaming cream and shaving brushes. The brush can be selected from badger, pork or synthetic bristles. The size of the brush should be sufficient for convenient application of the cream, while not too large. The bigger it is, the higher the expense of the funds and the more likely it is to get dirty or get into your nose or mouth.
First you need to fill the container with hot water and put a small brush in it. After that, it will become soft and will qualitatively perform its functions - to foam and evenly apply the cream on the bristles. After steaming, cream or soap is added to the container and foamed with a brush. The result should be a dense and resistant foam. The resulting tool should be carefully applied to the face with light circular motions in a thick layer.

Shaving rules and technique
There are a few simple rules for how to shave a straight razor:
- It is important to keep calm during the procedure.
- The blade should be well sharpened. This affects both the quality of shaving and its safety. The sharper the blade, the smaller the cuts.
- In the process of shaving, using your hands, pull the skin down. This will greatly facilitate the removal of bristles by increasing the viewing angle and protect against cuts.
- First, remove the hair in the direction of growth, and then - against. 3 approaches are required to obtain an optimal result. Between them it is necessary to cover the face with foam again.
- Each approach begins with short strokes, and ends with long ones. It is necessary to tighten the skin with a razor-free hand before each movement of the hand.
- Do not hold the tip sideways or parallel to the skin.
- No need to put extra effort during shaving.

How to hold a razor
You can keep the razor in different ways:
- The thumb is placed on the back of the back, the little finger on the tip so that the heel (sting) is located between the little finger and the ring finger. The remaining fingers are held on the earl from above.
- The little finger is located on the notch of the tail, large - on the flat part of the earl from the inside, and the rest - from the outside. The sting in this case looks up.
- The middle and index fingers are placed on the inner side of the earl, the ring finger on the inside of the shank, holding it, and the little finger on the tail notch. With your thumb, we support the pickaxe at the junction of the shank with the web. The sting in this case also looks up, and the handle fits tightly to the wrist.
- The brush should move often, easily, rhythmically. If you put pressure on the blade or put your entire hand into the work, you can cut yourself or pull out hairs.

Proper skin tension
The technique of shaving with a straight razor also includes tightening the skin correctly during the procedure. This should be done in the opposite direction of the razor.
The skin is stretched with the index or middle finger, which is placed 2-3 cm below the blade. Only after that the razor moves.
Blade angle
The tool should move the head forward at an inclination of 30-40 °. This will ensure easy gliding and effective hair removal. If the angle is sharper, the razor will slide over the bristles without cutting. If more, increase the likelihood of cuts. In order to obtain the necessary tilt of the blade, it is applied to the skin flat, and then, gradually raising, achieve the desired angle.

Stages of the procedure
Shaving with a straight razor starts from the temple line, setting the blade on its edging, towards the cheek. Then direct the handle to the lower jaw. In the middle of the cheek turn the instrument in the direction of the earlobe and move to the jaw.
We shave a neck from a corner of a lower jaw down. Especially careful to be in the ear, where there are often irregularities and folds of the skin. To avoid cuts, we move the lobe to the side with the thumb of the free hand, pulling the skin and covering the ear with a hand as a limiter.
Now you need to take the razor in the third way. The tool should be placed in the middle of the cheek, directing the head under the cheekbone. Shaving is necessary in the direction of the lips, passing the bulge of the lower jaw and the mustache area. Removing the bristles in the corner of the mouth, lower the toe of the instrument until it coincides with the line of the mouth. Then shave the bushes - the hair at the bottom lip.
Since there is an anatomical cavity in this place, it is necessary to lift the skin with the tongue from the inside. Helping yourself with facial muscles and tongue can facilitate the process of shaving. Shaving under the lower lip, you need to be especially careful not to cut a small protrusion under it.

The next step is shaving a mustache. In this zone, hair grows from top to bottom. It is worth helping yourself with the muscles of the face, stretching and smoothing the skin. Additionally, you can lift the tip of the nose with your free hand.
We take the razor in the hands of 1 way, remove the hair with short and clear strokes. The sides of the whiskers are shaved from right to left with the toe of the razor, in the direction of the middle of the upper lip, holding the razor in a third way.
Remove the hair from the chin to the middle of the jaw, holding the tool in 1 or 2 ways. Here we stretch the skin a little differently - on two sides with two fingers of our free hand. We put one on the chin, the other on the jaw, and place the razor between them. Hair removed, a little going around the corner of the jaw.
The final stage is neck shaving. Here a dangerous site is Adam. To prevent the appearance of cuts, the skin is pulled a little to one side. It is more convenient to keep the razor in 2 ways.
Repeated hair removal is performed in the opposite direction. The process starts this time from the bottom of the neck and ends at the temples. The right side of the face is more convenient to shave in 3 ways, and the left - choosing the option that least obscures the view.
We move forward from below, smoothly passing through the angle of the jaw to the cheek. From the cheek we move to the chin, removing the lower part of the whiskers and the hair in the corners of the mouth as we move. Finally, shave the chin and upper lip. If a third set is required, shaving is performed against hair growth.
Shaving the head with a straight razor starts from the front and sides. The approach is the same as for the face. First, shave the hair in the direction of growth, and then against it. For processing the back of the head using a manual or desktop mirror.

Shaving this area is complicated by the occipital folds of the skin and the bends of the skull. If you are not confident in yourself, it is better to finish shaving with a safe machine.
Aftershave care
After shaving you need to wash off the remnants of foam with cool water to close the pores on the skin. Since in the process of working with an open blade, an exfoliation occurs (the upper layer of the epidermis is removed), aggressive skin care products, including alcohol-containing ones, can lead to irritation and flaking.
Alcohol is acceptable to handle cuts and scratches. After washing, you can apply a towel to your face moistened with warm water or a decoction of herbs (chamomile, calendula, etc.) with the addition of essential oils.
Razor sharpening
There is a whole set of recommendations on how to sharpen a straight razor correctly.
Sharpening is carried out in several stages, using stones of different abrasivity - the ass. Rule with a belt. For the first time, GOI paste can be used for sharpening correction.

Before you start sharpening, it is necessary to evaluate and, if necessary, correct the geometry of the blade. It affects the choice of grinding stone and the method of sharpening.
To determine the geometry, the razor is placed on a flat surface and viewed how many gaps between the blade and the surface. The edge and edge on both sides should fit snugly to the plane. If gaps exist, they must first be eliminated with a stone with a large abrasive.
The razor, sharpened at the corners, the angle of sharpening of the cutting edge is 16 °. The process takes place in three ways: with the help of stone, sandpaper and belt.
Water stones are moistened with water before work, and oil - with oil.
When sharpening, the razor is placed on the stone with the whole plane and carried forward - on the grain, and then back. In order not to bend the edge during the passage on the blade can not be pressed. With one hand, hold the razor by the handle, and with the other press the blade against the stone. Turn the tool only through the pick.
Stones for sharpening razors at different stages will require different. Initially, a 1000 grit stone is used, on which the working edge is formed. The sharpening goes until it stretches into a straight line and stops “dancing” on the mirror. After the formation of the correct geometry, the blade with the heel of the sharp edge is placed on the edge of the stone and stretched to the nose, eliminating the burrs.

Then, on stones 2-3 and 6-10 thousand grit under the control of a magnifying glass smooth down the risks from a rough stone.
Sharpening a straight razor for the first time ends with a shoe strap. Then use leather, belts should be slightly wider than the blade, so that the editing is uniform, and double-sided. One side is made of leather, the other is made of fabric. For 15 postings on a fabric basis, there are 50 wires on the skin. For convenience, the belt tension.
In the process of sharpening razor hold the shin with one hand and pressed to the belt with the other. The blade is placed flat and pulling the tongue forward. Editing is accompanied by a distinctive sound.
The surface of the belt must be clean and smooth, the defective coating will have to be cleaned and polished. Before use, rub the belt with hand to heat and remove dust particles.

After editing the shaver must be checked for the quality of the sharpening. To do this, make 5-10 light postings with a razor on the shoe strap with a butt paste forward, and then cut the hair on weight at a distance of 10 mm from the finger. If the hair is not cut, start sharpening first.
The most dangerous areas for shaving with a straight razor are the upper lip, ear area and kadik because of folds and bumps due to the anatomical structure. Here you need to be especially careful to avoid cuts. It is recommended to carefully stretch the skin with your hands.
Do not be shy and help yourself with the tongue, facial muscles of the face, further stretching the skin. Then the dangerous areas will become more accessible, and the visibility will increase.
To preserve the shaver, it should be thoroughly washed and dried. Additionally, you can lubricate the metal with oil to protect against corrosion.